How to Install Memory in a Laptop: Step-by-Step Guide
Another most effective and cheap solution to enhancing the performance of your laptop is to upgrade its RAM. Whether your laptop has problems with multiple browser tabs, or is just too slow to run creative software, or even just can’t cope with your workload, adding or replacing memory can be a great way to improve your laptop’s performance. Although the process can be daunting when you have never opened a computer, with proper preparation and following some simple guidelines, most individuals can successfully perform an upgrade to RAM at home without special technical knowledge. This tutorial explains the procedure of installing memory on a laptop, step by step.
The Importance of RAM and RAM Upgrades
RAM, or the Random Access Memory, is the short-term memory of your computer that it uses to store data that is in the process of being processed. In contrast to your hard drive or SSD, which files are permanently stored, RAM only works as long as the computer is being used. The larger the RAM the higher the number of tasks that your computer can perform at once without slowing down.
Indications that your laptop requires increased RAM include slow performance during switching between applications, frequent freezing or stuttering, high memory consumption indicated in Task Manager on Windows or Activity Monitor on Mac, and program and file loads taking a long time. To most common users, 8GB RAM is a minimum, and 16GB is comfortable when multitasking and doing light creative tasks. Video editing, 3D rendering or very large datasets frequently demand 32GB or greater power users.
Step One: Determine whether your laptop RAM is upgradeable
Be sure that your particular model of laptop supports RAM upgrades before buying anything. This has been adopted by many modern ultrabooks and thin laptops, such as recent Apple MacBook and some XPS configurations made by Dell, which have their RAM soldered to the motherboard, and cannot be readily upgraded without professional tools. Accessible RAM slots are available on other laptops such as the majority of business-class laptops and gaming laptops, and can be upgraded by the user.
Check upgradability: To verify upgradeability, enter the model number of your laptop in the manual or on the manufacturer’s Web site. The specifications page will generally specify whether the RAM is upgradeable, the number of slots it has, the maximum RAM it can handle, and the type of RAM that your laptop needs. Alternatively, programmes such as Crucial System Scanner or CPU-Z on Windows can give you all the information needed on the amount of RAM you currently have and what upgrades are compatible with it.
Step Two: Determine the type of RAM used
Not all laptops have the same RAM. Laptops have different types of RAM, speeds, and form factors. The DDR4 or DDR5 SODIMM RAM is a smaller size than the DIMM RAM of desktop computers, and it is employed in most modern laptops. Speed rating which is expressed in MHz should be equal to or higher than the supported speed in the specifications of your laptop. Installation of the wrong RAM may result in a failure to start the laptop.
Your laptop manual or manufacturer web site will tell you the specifications of the RAM. Note the DDR generation, the speed, and the maximum capacity per slot. The example of a laptop is that it may have DDR4-3200 RAM with a maximum speed of 32GB per slot and has two slots. Here you would install two 32GB cards to have a total of 64GB.
Step Three: Buy the appropriate RAM
After determining your specifications, buy RAM of a reputable maker. Such brands as Crucial, Kingston, Corsair, Samsung, and SK Hynes are reputable with laptop memory. Purchase a reputable seller with a refund policy, in the event the RAM proves to be incompatible with your particular system even though it fits the specifications provided in the published specifications.
When filling more than one slot, you may want to consider buying a RAM upgrade kit that contains matching sticks. Dual-channel operation of running matched pairs of RAM can offer a significant performance advantage compared to running mismatched or single sticks.
Step Four: Assemble Your Tools
Most laptops will only require a small Phillips head screwdriver to remove the bottom panel to access the RAM slots. Torx or Pentalobe screws are used in some laptops, therefore, check beforehand. A spudger or plastic prying tool can be useful to have in order to take the bottom panel off without scratching or bending it. An anti-static wrist strap, or a grounding technique will also be of interest to you to avoid the possibility of damaging your components due to a discharge of statical energy. When you are not wearing a wrist strap, reach a big metal object that is connected to the ground before handling the RAM.
Step Five: Save your information
You should save your information to an external drive or cloud storage before putting your laptop on. Although a RAM upgrade is not likely to have an impact on your files, every time you open a computer there is the possibility of accidentally damaging it. Full backup will make sure that your data is secured irrespective of the occurrence.
Step Six: Get Ready to Work
Select a clean, flat, bright surface upon which to work. Wooden desks or tables are better than carpeted floors which can release statical energy. Clean the work area of any liquids. Note: shut down your laptop and not sleeping or hibernating but completely shut down and disconnect it to a power source. Also unplug any external devices like USB devices or external monitors, where possible.
Step Seven: Turn on the Laptop
Invert the laptop and find the screws that are securing the bottom panel on the laptop. Take off all the screws and store them in a small box ensuring that none of them are lost. There are those laptops with rubber feet covering the screws or with screws of varying lengths at varying positions. Record a picture of the bottom to keep track of the screws.
After unscrewing the screws, proceed with your plastic prying tool and pry the bottom panel off of the chassis in a gentle manner. Carefully work around the edges allowing the plastic clips that hold the panel in place to release. Do not force it. Should it be met with resistance, look around to make sure you have not left any screws behind then pry more vigorously.
Step Eight: Find the RAM Slots
After you have removed the panel, find the RAM modules. They are generally silver rectangular sticks which are placed in holes in the motherboard, and are often partly covered with a film of tape, or a fine protective shield. Each stick will have little metal clips on both sides to ensure that they are stuck. When changing existing RAM you should remember the manner in which you installed the existing sticks and remove them prior to installing the new ones.
Step Nine: Take Out the Existing RAM When replacing it
When replacing old RAM and not adding to empty slots, you need to push the metal clips on each side of the slot away in the same direction at the same time. The RAM stick will be appearing on an angle. You can pick it up by the edges, not touching the gold contacts or any of the chips on the surface, and slide it out at that angle. Gently lift it and put on anti-static surface.
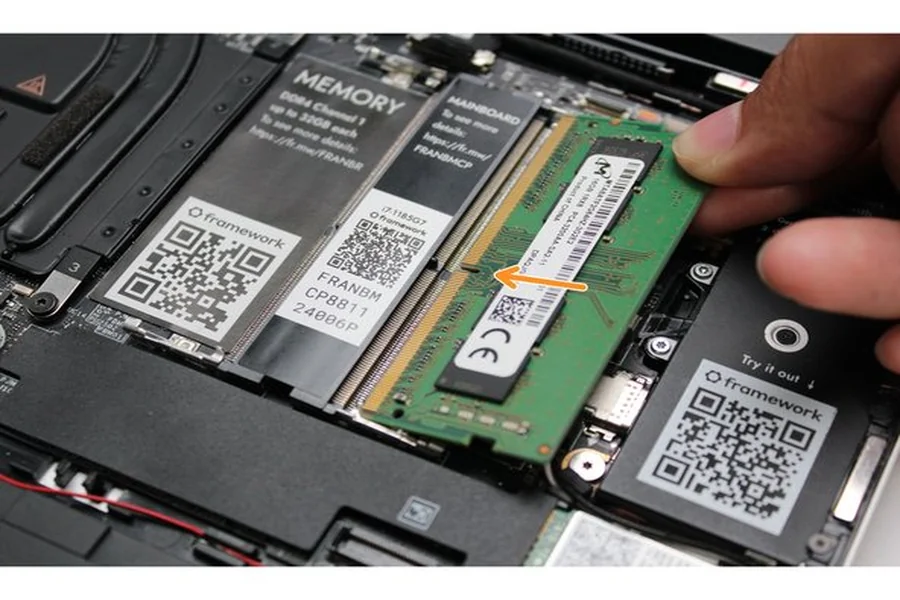
Step Ten: Fit in the New RAM
Grasp the new RAM stick with its edges and make sure that the notch on the gold contact edge fits in the matching key in the RAM slot. This makes sure that you are putting it in the right position. Place the stick at angle 30-45 degrees and scrape it firmly, yet gently, into the slot until it snaps into place. Next push the stick in until both sides of the clips are in place, securing the RAM flat to the motherboard.
In case of using two sticks, do the same with the second slot. Install them in the corresponding slots pairs that your laptop manufacturer suggests to operate in a dual-channel mode.
Step Eleven: Put Back and Test
Install the bottom panel by matching it and pushing along the edges to connect the clips. Reinstall all screws. Invert the laptop, insert power adapter and turn it on. The first time the laptop is booted may need a little more time than normal because it requires it to recognize the new memory setup. There are also some laptops which show a memory configuration page or have you press a key to prove the alteration. After booting, ensure that the new RAM is accepted by examining the Task Manager on windows or System Information on Mac.
Hardware and tech resources Tech resources and hardware guidelines on websites such as karaktech are more model-specific tutorials that can supplement this general guide, in case you need step-by-step instructions specific to a particular laptop brand or specific model.
FAQs
Can I add RAM to any laptop?
Not every laptop supports user-upgradable RAM. Thin ultrabooks and many modern Macs have RAM soldered to the motherboard. Always verify whether your specific model supports RAM upgrades before purchasing anything.
Will adding more RAM void my laptop warranty?
In many cases, user RAM upgrades do not void the warranty, particularly for business-class laptops. However, policies vary by manufacturer. Check your warranty documentation or contact the manufacturer before opening the laptop.
Do I need to reinstall my operating system after adding RAM?
No. Adding or replacing RAM does not require reinstalling your operating system. Your computer will automatically detect the new memory on the next boot.
What happens if I install incompatible RAM?
If the RAM is incompatible, your laptop may fail to boot, display error messages, or operate unstably. Remove the incompatible RAM and reinstall the original sticks to restore normal function. Always double-check compatibility before purchasing.
Is 8GB or 16GB RAM enough for everyday laptop use?
For most everyday tasks including web browsing, email, office applications, and light multitasking, 8GB is sufficient. For smoother performance with many applications open simultaneously, video streaming, and occasional gaming or creative work, 16GB is recommended.
Can I mix different RAM brands in my laptop?
Technically, yes, but it is not recommended. Mixing brands, speeds, or capacities can cause instability and may prevent dual-channel operation. For best results, use a matched pair of RAM sticks from the same manufacturer and batch.